Monday 8 December 2014

Maps and Journeys- Bacteria and Supplies Finally Arrive and Agar Creation.

Shortly after I made my previous post about my DNA composition, I was given project approval after many weeks of deliberation and being sent from one person to another. As soon as I heard I got straight on the phone to the supplier of the bacteria and I made my order. They luckily were just about to place an order that day so I was able to get it at just the right time. The materials I needed to make the agar were also ordered and arrived about a day later.

I found the process of making the agar fairly simple, as the solution was 10% salt, you could sterilise it by boiling it. I disinfected all of my kit before doing so and measured out the ingredients as accurately as possible. However, whilst I was boiling it the first time I made it, the mixture boiled over as I took my eye of it for just a few seconds. I was aware that the agar could boil over very suddenly, and so it was my own fault for not paying full attention. The next time I made it, I paid much more attention to what I was doing. I boiled the solution for 15 minutes to make sure the mixture was totally sterilised and all the ingredients were fully dissolved. I then waited until the mixture was about 55c before pouring it into the petri dishes. I then left them to cool and solidify. During the agar making process I did not take any pictures purely for the reason that I wanted to make sure the area was as clean and my attention was fully on what I was doing. However, I will link the method and recipe I was using from this website: http://teach.genetics.utah.edu/content/gsl/html/agar.html

A couple of days later my bacteria arrived. As soon as it arrived I had to inspect it to make sure it was alive, and to remove the tape from the petri dish to allow it to get some oxygen. I wrapped it in blankets as well to try and keep it at a temperature near to 20c so that it would grow properly as it is way too cold at this time of year. Later that evening, I also looked at it in the dark to see how much light it gave off and also how dark it had to be in order to view it:


I was happy with the colour it turned out, as I was either expecting a green or blue glow. I was also happy with how they could be photographed and I intend to feature photography heavily in the outcome of this project. However I could not film the bacteria as it would not pick up on the camera very easily. To take the photographs I had to do a long exposure of 30 seconds in order for it to be properly exposed, so to make up for this I will be playing around with different concepts I could use to photograph this bacteria. 

I then used my inoculation loops to transfer the bacteria to the other petri dishes to see if they would grow too. In the meantime I also hollowed out the lightbulbs and made my agar to go inside them as well. 

Thursday 27 November 2014

Professional Toolkit- Filming and Working with Actors.

Our filming day had finally come, and on the first of our two day shoot we were not working with our actor, so most of the day was spent getting any shots or cutaways that did not require the actor. We also lit the master shot for when the actor arrived the next day, so that we could have that ready to go when we got the actor in the next day. We wanted to have as much time with the actor performing as possible so that we could get the most out of him.

I spent most of this day being the stand-in for the actor while the others lit the scene and took some more test shots for the green screen.

On the second day, our actor arrived early as he would rather have been early than late so we set up very quickly and got the actor briefed and with refreshments while we tried to set up the first shot as quickly as possible. Our actor in general was lovely and offered to help on set multiple times. He was also very easy going and didn't need a lot of direction to get what we wanted which was great and very lucky for us. During lunch I spoke to him a little bit about what he does mostly and he described how he had mixed experience of theater and TV. He had done some issue based work before concerning drugs etc. and so I found it very interesting that he was enthusiastic about our project based on his previous work.

On the shoot, I started doing script supervision on the second day and kept timing. Since we started early we were ahead of schedule by about half an hour, so I had to make calls about when we had lunch and which shots we should get done before and after the break. Since we had a subway platter delivered at around 12 I had to make the call to have lunch then rather than at 1. I also took timings of each shot and notes throughout as a script supervisor would to try and highlight any potential continuity problems or give the editor an idea of which takes of the shots appeared to work the best with director's comments and anything I noticed about the shots myself.

Overall it was a very relaxed shooting experience. It was exciting as I felt very professional and we worked very efficiently. The most exciting part of it was seeing all the dollies being used and how the takes ran with the director giving ques and watching from a monitor.


Professional Toolkit- Finishing Set Build (Flooring and Finishing Touches)

Last Friday we had our last push to finish building the set before our shoot beginning on Monday morning. With our walls now fitted with wallpaper and painted over, the set was beginning to look so much more like the gallery space we were going for.


As you can see from the picture above, we now had to put the flooring in. We decided to go for a laminate flooring as it looks much better than lino and we could fit it together and take it apart easily. However, having never bought flooring before, I misjudged the amount we would need. I measured out my set in meters and when we looked at the packaging it described an area of square meters. However I mistook that for meters squared, which are very different things. So, we lost money because we had to purchase more flooring than we thought we needed. However we were using the cheapest flooring we could find and so the look we got in the end was very good, despite the cost.


As one of our walls was at an angle to make it easier to extend the corridor in post-production, we had to use some of the last boards to cut them to size.


However it worked really well, and with our prop positioning we could cover up and slightly obvious problems with the flooring. Most of which was at the front of the set, and since we would not be seeing the floor at that part of the set it didn't matter so much.

Whilst this was going on, we had to go and find plinths to complete our gallery look. We knew there were some dotted around the campus, so we went to find some. We managed to get some help from one of the technicians, who took us out to a large bin full of ones of all sizes. 


The final thing to do was to print our 'artwork' to go on the walls of the gallery. I did this just using foam board to mount and printing on standard paper as we were not going to be doing so many close-ups it didn't have to look perfect.


Once this was done, the director and cinematographer went about lighting the set so that we would be ready to go on Monday straight away, and prevent any unnecessary time wasting. Once this was done our set was complete, and all the work over the last week was finally realised.


Monday 17 November 2014

Maps and Journeys- DNA Composition

Due to the delay on my project being passed, I felt it was time to come up with an idea to turn my installation in another direction, should I not be able to carry out with my original plan. I would still have UV lightbulbs, but I would do it with some other UV source to represent the bacteria. However, conceptually I found this to be not as strong, as the whole idea surrounded the idea of physically being able to see the bacteria glowing. So, I thought to represent the bacteria in another way; with sound.

Throughout the early research of this project, I came across an increasing number of projects which turn DNA into sound or musical compositions. Although this sounds quite artistic, the main reason this is coming about is due to wanting scientists with visual impairments to be able to carry out their research with much more ease than they do currently. I found this really interesting, because it is creating a way for people to experience something in a way which is not natural. So I decided to do a little more research about how this is done.

First I found a TED talk which discusses how bacteria 'talk' to each other:


Ironically, the example in the video is the bacteria strain that I want to use for my lightbulbs.

I then tried to find some sort of breakdown of how you go about turning DNA into music, and I found a very useful website which explains it very well: http://www.whozoo.org/mac/Music/Primer/Primer_index.htm

From this site, I could gather that music from DNA is made up of 3 things; amino acids, primary structure and tertiary structure. These things determine the notes/scale, rhythm, and melody. So basically what you have to do is break down the DNA into amino acids, and then order those amino acids into a scale, and then play those amino acids in the order they come in on the DNA strand protein sequence:


GFP is the DNA which allows the bacteria to glow, and the DNA sequence is shown by the long string of letters on the top of each row. Each letter is called a nucleotide and a group of 3 letters corresponds to a codon, which is something which codes an amino acid to be formed as part of the DNA sequence. On the bottom row, where the letters are all spaced out, these letters represent the individual amino acids in the string of DNA. You can find out which amino acids these are by looking at this table:


With these letters you can then go about putting them into a scale. Now you can choose how you order them, but it has to be done logically; by ordering them on how hydrophobic (water insoluble) or hydrophilic (water soluble) they are.

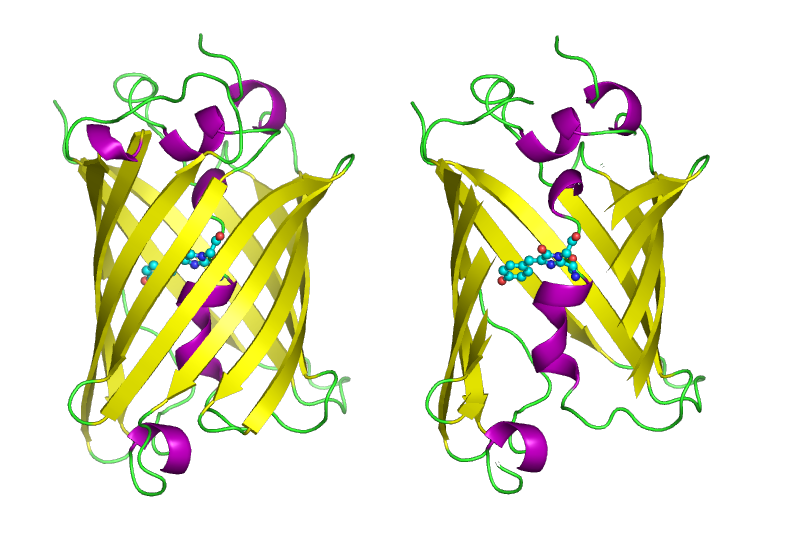
Then you have to create your rhythm, and this done by looking at how the DNA turns. DNA folds and turns in specific ways to enable them to interact with other molecules. Alpha helix turns in circles and Beta strands move together and apart like an accordion. Creating an image like:

The alpha helix is represented in purple, and the beta strands are in yellow.

So, I am going to give this a go and see how I get on, I may seek help from someone in sound design at uni to see if they can give me some insight into the project.

Maps and Journeys- Risk Assessments

Over the last couple of weeks in the maps and journeys project, my time has been taken up mostly by risk assessments being done and re-done. This is due to the nature of the project involving live bacteria and the necessity of getting materials used to create the agar solution delivered to the university.

The first time I did the risk assessment, I did two as I wanted to differentiate between the growing of the bacteria and the display of that bacteria. However, since then it has become apparent that we may be showing our work in a gallery throughout the end of January to the middle of February, so I have put that side on hold until I have more information about the space.

My initial risk assessment was rejected because it did not contain enough information about the products I wanted to order, and the lecturers wanted to do some more research into the bacteria I wanted to grow to check for toxicity etc. So, I went to the supplier I was looking at using and found some safety data sheets of the products and bacteria to attach to the risk assessment. I then sent this off, hoping that this would be sufficient.

The order of the products was then put on hold as the project needed to be reviewed, and Rosie wanted some more advice on the project. She sent it to Tim Savage, who helps with a lot of the risk assessments across the uni, and orders chemicals for photography and other subjects fairly often. He then made some comments about my risk assessment:

Assuming that this is a residence, where in the house will the culture be grown?  Avoid food preparation areas.
Is it a house share?  If so all others who may come into contact with the space should be notified and forewarned.  
In what vessel will the algae be grown?
How long with the algae/bacteria be grown for, is it intended that it would reach spore stage (risk of inhalation and spread increases with time).
What control measures are in place to prevent unwanted bacteria (such as e-coli) growing in the form (a control measure would be anyone coming in to contact with the dish wearing masks and keeping it covered).
The algae should assume a known colour if it remains uncontaminated during growth, if the colour changes to unfamiliar (or red), the cultures should be disposed of.
Hands should be washed with soap and water after all contact with the materials.
What type of lightbulbs would be used, do they contain gas under pressure?
Temperatures of storage are listed at 10-30 degrees on the MSDS sheet, will the light bulbs will be switched on and if so do they run at heat?
Hollowing bulbs should take place within cloth or confined space to reduce the risk of shards escaping into other areas (bulbs are usually a vacuum which means the glass is likely to shatter).
The risk assessment doesn’t describe hazards associated with actual filming process and production, cameras, cables, lighting…etc.
The risk assessment doesn’t describe arrangements for clearing up in the event of spillage.
The risk assessment doesn’t describe how the disposal of contaminated materials and broken glass will be managed.

This was a lot of changes to undertake, however they were necessary and the comments made were helpful as I hasn't even thought of them. I made some adjustments and sent it off again. Rosie asked about the gallery work as well, and Tim said that it could be more challenging, but if the work was grown properly then it should not be hazardous. He suggested to have it sent off to Ceri, who is the head of health and safety in the university. She made some comments as well this morning:

Overall I am happy for this to go ahead.  My only comments is the location of where this is going ahead is unclear and also in terms of cleaning they mention a water/bleach mix but have not identified any chemical hazards.  If bleach comes into contact with other chemicals it can release a chlorine gas.  Lucy will need to get the Safety data sheet for the cleaning agent used and add additional controls to the risk assessment for this.  I would also advise checking to see if anyone who is doing the filming has an allergy to chlorine?

This was great news for me, and I was more than happy to make the minor adjustments. I am now waiting on a reply, and hope that my project can finally get approval. I also have a meeting with the curator of the gallery this week to discuss the project, and I'm hoping that I can discuss the risks in a bit more detail with him to assure him with ways in which the project can be erected and remain in the gallery safely throughout the 3 weeks.

Studio Shoot-Set Building and Gathering Materials.

After beginning to build our set, I had a much clearer idea of what we needed and how much we needed for our set build. So, I went down to the local Homebase to get an idea of pricing and styles.


 Unfortunately, when I went to collect some materials for the shoot with Rosie, the flooring I wanted was not available, so I will have to go again this week to get that as our final set build equipment required.

I also now have a good idea of props. We need:

-2-3 white plinths
-TV screen/Computer monitor
-Prints of phones (A3)
-Picture Frames
-Old phones

The job this week is to go and book those plinths out from stores for our shoot, and then to get the posters designed and printed for our shoot. Also, I have 2 old phones that can be of use for our shoot and so that takes care of our biggest issue prop-wise.


The rest of the day on Friday was spent scraping the wallpaper off of the flats that were left there by other projects, and then in the last part of the day we got to wallpapering a small portion of the set ready for painting next week.


Professional Toolkit- Directing Actors Workshop

We have just reached the end of our directing actors workshop, a two day workshop that taught us how to efficiently direct actors on set, and helped us understand how to cast actors as well. This workshop was incredibly useful and dynamic and allowed me to think differently about the collaboration of actors and directors.

During the first day we covered:

-Framing/Shot Types
-Directing/Acting Language
-Actions
-Casting

On the second day we covered:

-Breaking down a scene into actions/activities
-Status changes throughout a scene
-Giving direction to actors
-Collaborating with actors on set.

Day 1- On the first day we were introduced to one of the actors we would be working with over the next couple of days. Nigel went through the idea of language and sharing a common vocabulary with actors. He went through what he considers to be each shot type (Close-Up etc) as these can vary from director to director. Then he went through some vocabulary that film actors and stage actors use and showed how that can be confusing, and you may end up with a miscommunication problem, so it's key to go through some things with your actor first to allow you to share some common ground on set; making the flow of the production more efficient from the start.

We also went through the concept of 'actions' in acting and directing. Nigel described how some actions you give an actor may or may not be 'playable'. Playable actions consist of verbs, or something which can be described using one word. E.g. Challenge, Dazzle etc. are playable actions. It appears that the communication you have with an actor has to be concise as your rehearsal time may be minimal or nonexistent depending on what you're shooting, and if this is the case then you need to be able to communicate exactly what you want from an actor in a short space of time; Choosing your words carefully could mean the difference between a great take or not, as we saw in the examples Nigel gave of 'Heat' and 'LA Takedown'.

Finally, Nigel went through casting with us. He said that casting gave us a chance as a director to see if you can direct the actors and whether there are any problems with the script that the actor may have picked up on, if you asked them what they thought of it. Time is money in this situation, and so you have to be welcoming with an actor, but not ask them open ended questions that may lead to time wasting. The next thing you need to do is ask them to read or act out (if a non-speaking role) a pre-agreed piece, and then after they have finished you can give them a note (a piece of direction) to see how they react to your direction and see if you have a common language.

Day 2- On the second day we were introduced to the other actor we would be working with, and were asked to read through a script the day before. Nigel started by getting us to do some acting exercises. The second one we did was interesting because it showed us how acting as if we are in a situation is different to actually being in that situation. He wanted to highlight how acting is fairly close to what you do in real life, but not quite. The actor has to play the actions according to the shot e.g. exaggerating facial movements in a close-up. He showed us through the actors and the scene we were asked to read, how giving different direction and using different words to describe an action can completely change a scene.

The other main thing we looked at was power in a scene, between characters. This is called 'Status' and in a scene you should be able to see the status fluctuate between characters as a scene progresses. The actors showed us how you see status change between characters in the scene we were previously working on. By assigning someone a number from 1-10, you can easily communicate where the power shifts need to happen, and who has more status than whom. This can provide the actor with more information on how to play the scene, and make the scene a lot better.

Over the two days, I learnt some really valuable things about direction, from a practical point of view which really made it clear to me how working with an actor needs to be approached. I am confident that if I used the tips in this workshop then I will be able to create an efficient relationship between the actor and director.

Wednesday 12 November 2014

Professional Toolkit- First Set Building and Grip/Green Screen Workshop.

Last Friday, we all got together with Anne to discuss our studio shoots and to start looking at the equipment in the studio, including gripping and green screen. However Chris Pinnock suggested that we start building our sets so we can see what they look like and so it saves us time later.


As the production designer, this was a golden opportunity for me to physically see the space I will be working with, and it would really help me get a better idea of what I have to do to the space to make it realistic for the scene we will be shooting.

The first thing we did was put up the flats and bolt them together. We decided to have one of the walls at an angle to make the room appear longer than it is, which would help the set extension later on. Also, the set is quite narrow to make it more like a corridor so we'll have to shape the prop placement around that. 

Also, once the set was lit I got an idea of where the wall props needed to be placed and how big they could be. Also, with the set length I now know how many plinths I need to gather/make.


The main realisation I had about the set was that the walls needed to be really scraped down and the gaps filled before we put any lining paper down. Also, the lining paper needs to be left to dry for nearly a day before we paint it to make sure it is done properly. So the first thing we should do is take care of the walls and line them before doing anything else to the set, so that we can be getting on with other tasks while the walls dry.


Looking at gripping was also interesting as the movements on the dolly were very smooth, and even more interesting was that the dolly we were using was previously owned by Stanley Kubrick!

What I need to do now is get a list of materials together so Rosie can start ordering our materials and we can get ahead on our set build.


Tuesday 28 October 2014

Maps and Journeys- Light Bulb Test 1

After my presentation last Thursday, I had some feedback which left me with a few notes of my own:

-Think about the design of the installation
-Think about the risks involved.
-How will I get a hold of the light bulbs/ other materials?
-Be careful of time frame
-How can I relate the installation back to the idea of sustainability.

Before tackling any of the others, I wanted to confront the safety issues and the practicability of hollowing out the light bulbs. To do this, I went and bought a few light bulbs to try it with. I was also following the tutorial here.


I gathered the tools I needed (pliers, screwdriver) and put everything inside a box to catch the glass as it breaks and falls. I also have some gardening gloves to protect my hands from any shards.


...And here are the goggles I'm wearing to protect my eyes!

Initially the first steps of the hollowing was fairly easy, slightly fiddly but I imagine after doing it a few times I would get the hang of it. The challenge came when I had to break the glass to actually get the filament out.


In the light bulb I was using were the glass was, there was plastic. So, I tried it on another light bulb but the neck was too thin so the filament couldn't come out, which was disappointing. However, I now knew what size light bulb I needed and what to look out for when looking at the light bulbs I needed. 

So, I got a larger light bulb and tried it again, finding it a lot easier. The whole process only took about 5 minutes and before I knew it I had a hollow light bulb! 


On a side note, after taking out the filament there were still jagged edges on the inside rim of the light bulb so I took a rough nail file and sanded them down until they were smooth, thus making it safer for use. 


Then, I filled the light bulb with water to wash out any remaining particles of glass.


Now that I know how to hollow out the light bulbs, I need to figure out how I am going to suspend them, and find a room to hold my installation.


Monday 27 October 2014

Professional Toolkit- Set Design

After our fourth group meeting, we have finally come up with some sort of solid idea of what the set should look like, and as production designer it is my job to create this set and make it a possibility. Here are my notes from the meeting:

-Green screen on back wall
-Off-white walls
-Phones on display
-Pillars for displaying phones
-Pictures of phones on walls
-Grey flooring (to make it easier for set extension)

With these notes I can now go ahead and make some set plans and drawings:


The first is an overhead plan of the set, to show roughly where things are going to go and to get a sense of the space we will have, and the proportions of the room according to the measurements we have.


The second is a perspective of the set from the eye of the camera. This is to try and see how the set will look from the camera's perspective and gives a little more detail about where things are going to go. From this, the rest of the team can get more of an idea of what we are going for when we plan shots and when we come to build the set. 

The next thing I have to do is try and decide on the colours and materials for the room. From the notes I have said to use an off-white on the walls and to have a grey floor to make it easier for the set extension we will do. However I also need to think about what type of flooring we will use. For example, carpet I probably wouldn't find appropriate for our film so I need to consider what else we could use. Another thing which comes into it is availability; how available a certain material is and how much it might cost.

Wednesday 22 October 2014

Maps and Journeys- Installation Idea

After my last post highlighting my concern for the installation idea, I decided that the product design was a little too commercial, and that I wanted to create something much more conceptual. So I returned to an earlier idea I had of growing the bacteria on the inside of light bulbs, as well as petri dishes. I have seen something similar done before for the purpose of testing water for toxicity, but I wanted to create something on a larger scale.

I began researching light bulb installations and came across a photograph album of one called 'Scattered Light' by Jim Campbell:


I liked the idea of suspending the light bulbs and allowing an audience to walk through them. This to me would create an enchanting environment for my audience to view bio-luminescent bacteria whilst still conveying it as a light source. As we are seeing biology as light sources becoming more and more popular (as I showed in previous posts) it seems likely that light bulbs that glow green or blue from biological incandescence is a sight we may see in the near future.

Also, as part of the installation I would like to observe the bacteria as it grows, to show the process in which it becomes something of use to us as humans, and to show how the installation was made. After talking with Leah at the end of last year about laying bare your devices, I've begun to put a lot of value into that idea where it is appropriate, and in this case I feel that the process of creating the installation fills the brief as much as the outcome. The creative and scientific journey in creating sustainable lighting, and even the progression of ideas from looking at the connection between biology and man-made machines, to realising that this line between machine and biology is becoming increasingly thinner, is something important to demonstrate to an audience if they are to fully appreciate the installation itself.

In recording the process, I was thinking of taking a time-lapse of the bacteria growing, much like in this video:


I would also like to photograph the bacteria possibly through a microscope, but certainly at stages in its growth cycle, but also using written observations to present like a research diary, detailing the life of the organism which the audience could then view or had just viewed in the light bulb. I feel that it gives the audience essential context on the piece.

Monday 20 October 2014

Maps and Journeys- Whether my project is possible

After having scoured the internet for how to grow this bacteria and what I would I need, I found that most of the ingredients and supplies are relatively easy to get hold of. The only trouble I had finding was the bacteria itself. I found a company in America called Carolina.com, which supplies all manners of microbiology equipment. I saw that they did the type of bacteria I wanted; Vibrio Fischeri. However, the danger with importing live bacteria overseas is that sudden or extreme changes in temperature that may occur, could kill the bacteria. So, I looked through the information on their website and found that they also had stockists in other countries. So, I contacted their EU sales team and was referred to the only stockist in the UK, who would happily be able to provide me with the bacteria I needed for this project. Also, I discovered that under the right conditions, the bacteria should take about 4-5 days to dominate a petri dish, and so it would fit right with my project. I can continuously transfer bacteria on to new petri dishes to keep the bacteria alive and growing as I approach my assessment date.

I am still unsure about using the bacteria to create a product, as I feel I may not be relating it back to the brief enough. I know that the project directly relates to the brief and there is a very clear line in my research that shows how I got here, but I'm still feeling as if my project is lacking something.

After doing a little more research into how bacteria is being used for lighting, I came across a kickstarter for a children's toy called Dinopet:


This is a form of algae which becomes luminescent when disturbed by movement, and oxygen being pushed into it. The name 'dino pet' refers to the type of bacteria that is used to make this being called dinoflagellates. This is a phenomena seen on some beaches as the waves crash against each other:


I am still very interested in exploring this as my final outcome, especially now that I know it is much more possible to achieve than at first thoughts. However, between the dino pet, and the artwork I displayed in my last post, I am unsure in what form I should use to present it. However, I have also resolved to scientifically keep track of the bacterias' progress as it grows, and to take photos and videos as part of the process. I feel as if the process of making the piece will be as much a part of the outcome as the finished work itself.


Maps and Journeys- Further Research and Final Idea

In William Myers 'Bio Design: Nature, Science, Creativity' He demonstrates many ways in which nature and science are coming together to produce sustainable materials for the future to help the environment. Many of the pieces he demonstrated may feature heavily in the homes of tomorrow, as well as in the structure of the buildings themselves. I thought it important to research this side of the biological process as machine, as it is very much becoming a literal reality as well as the metaphorical one that I envisioned in my initial ideas for this project.

The most interesting one to me is the bio-light, which are containers of either bioluminescent bacteria, or enzymes and proteins which are needed to sustain illumination. These work at a lower temperature to produce incandescent lighting:


I started reading about this kind of product, and found that scientists all over the world are starting to develop lighting using sources such as this to find sustainable alternatives to electricity. For example, a French biochemist, Pierre Calleja, spent years developing an alternative to street lighting using bioluminescent algae. You can see that in his TED talk here.

After some further research I also found one example of artwork done by an artist and scientist, Hunter Cole, which was done using bioluminescent algae in petri dishes:


I became really excited by the idea of incorporating this into my project, and I suggested in a tutorial with Rosie that I create a lit map of the world using the petri dishes of bacteria to show how the world may be lit in the future. However, she felt that it did not need such a literal translation of the project. So instead, I proposed that I create a design of a futuristic lighting source that may enter the homes of tomorrow. This would be to demonstrate what kind of products we may be seeing in the future due to an increased need for sustainable products. My only concern with this project is the accessibility of all the supplies necessary to make this possible. I will have to do more research into this before proceeding.


Wednesday 15 October 2014

Maps and Journeys- Further Idea Research

After my tutorial with Kathleen, I took out the book she recommended as the idea I presented to her was related to the similarities between the human body, and the man made structures that exist in the modern world. (For example roads are mapped out much like capillary networks). In the book titled 'The Work of Art in the Age of Mechanical Reproduction' by Walter Benjamin, he discusses the value of art as technology has progressed throughout time. He makes an interesting argument which highlights how original artworks may have lost some of their value due to the ease of replication and emulation. At first I was somewhat skeptical about this idea, however the more I thought of current trends and technologies and how they are affecting photography and film as large parts of the creative industry, I realised that this was very much a current issue.

In relation to my idea, I began to realise that growing urban areas are due to new technologies that have come about in the same way as they have changed the creative industry, by being able to copy or emulate an earlier model. However, this does not affect my belief that modern processes are somewhat based on actions in the body. Keeping with the example of road networks (as this is the most strong example) from early Roman roads which were very straights, over time humans began to try and find quicker and easier ways of reaching their destination. Looking at modern road networks produces some interesting visual comparisons with that of capillary networks in the body:


However, this is not exclusive to humans alone. Capillary networks have been compared to bare tree branches before, and they appear on leaves as well.
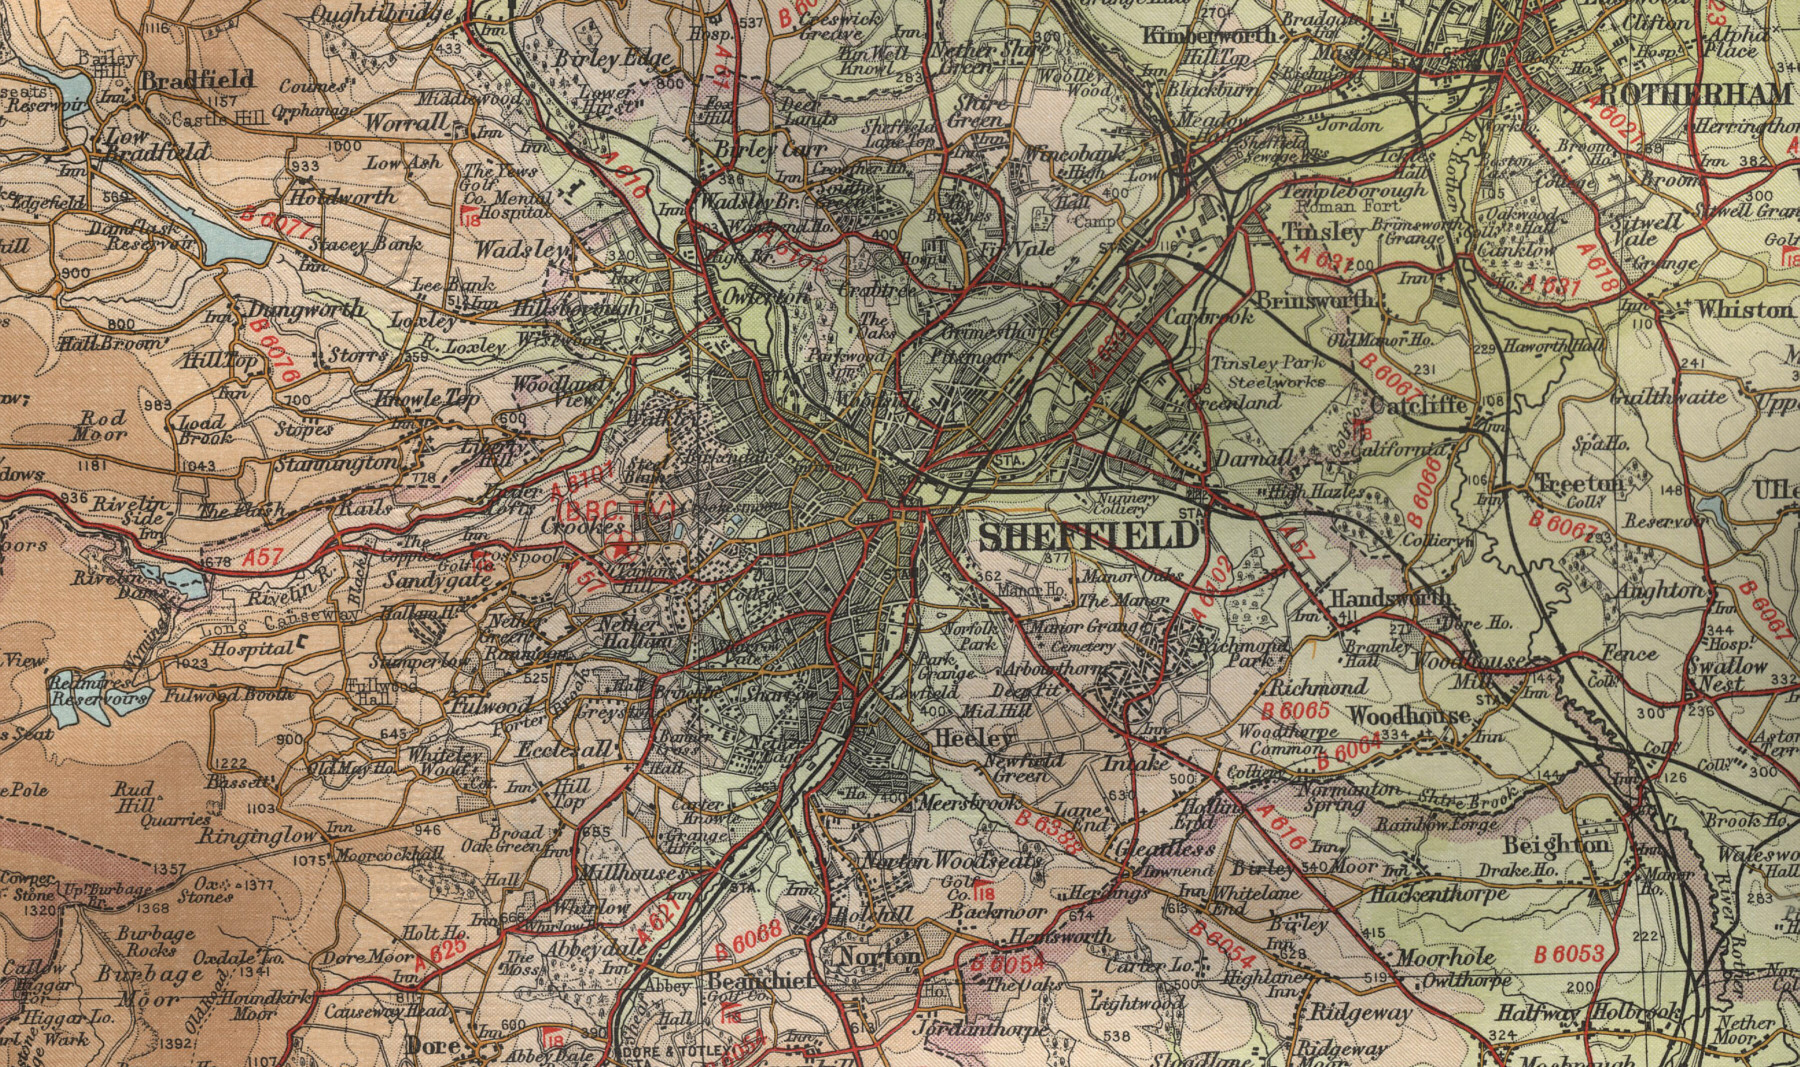
I wanted to see if other artwork relating to this had been done before, so I researched for artists that have cut up maps into shapes to see if I could find a similar comparison, and I found an artist called Shannon Rankin. Her works are mainly installation and all use maps to compare biological processes and to find patterns in nature. The one I found the most interesting was a series she entitled 'Anatomy' which can be found here. The series was doing exactly what I described, and using maps to make images of biological things such as the heart. About her work she said:

‘Maps depicting mountain ranges, roads, lakes and rivers resemble internal biological features, reproductive anatomy, skeletal structures and networks of the human body. Symbols of cities become acupuncture points, and meridian lines, like rivers, represent an internal system of communication and transport’.

I have to say that I completely agree with her on this view of the world, however in my project I would like to take a different approach in how I demonstrate this idea.

Sound Workshop- Polishing.

Having done the bulk of my work in Pro Tools, I started to pay attention to sound levels. Harry took us through how to create our master track, and how to compress tracks to ensure that our audio was mixed to -10db, which is the industry standard. For the most part, I found that my master track was overall slightly too loud, and this meant I could place a compressor on the master track to try and control the piece as a whole. However, there were still places where the sound went over the limit. Fixing this was not difficult, it's just a question of placing compressors on individual tracks, or taking the volume down on that track in general. However, it can be time consuming especially if you have many tracks and can't figure out where a particularly loud part of the piece is coming from.

Another issue I came across in the later parts of my editing was a couple of popping noises on one of the audio tracks. We tried to cut it out, and then crossfade other parts of the track together, but it made it worse, and it certainly didn't provide a solution. Pro Tools does have a feature which allows you to get rid of these anomalies, but unfortunately the versions of Pro Tools at the university did not include this. So, Harry suggested exporting the track into Adobe Audition and using an element of its noise reduction effects to get rid of this. It took a couple of tries, but thankfully the intelligent feature in Audition meant that the pops were completely gone/inaudible after going through the process.


After putting it back into Pro Tools, Audition had made the track into one connected piece (bottom) and you can see the original was disjointed (top).

Friday 10 October 2014

Maps and Journeys- Kathleen Rogers Lecture

I found the lecture this morning very helpful in looking at different ways to interpret the brief. Kathleen talked a lot about the creative process and the reasoning behind each outcome that she presented to us. She made it clear that her belief is that the journey of making the piece is as important, if not more so than the outcome you produce. She highlighted some very important points about how extensive research and pulling concepts from many different places will ultimately make the piece have a much better grounding as you will have more of an idea of where you are coming from when making the piece, and the likelihood is that this will show through in the outcome.

Another interesting thing about the lecture, with reference to the pieces she showed us, was her challenging the meaning of 'site specific'. We looked at a piece on lace that was handmade, and she commented that handmade objects have a particular 'vibe' about them, in the sense that there is a lot of cultural history behind them that give them some sort of value. Also, the observation of the object, and our interpretation of the object changes the object itself in terms of what it means to the viewer. We co-create the objects even after they have been physically made. She said a similar thing about site-specific with reference to places as well. The known history of a place, with links to culture, can produce a particular vibe about the place, as she showed us with her video on the group of mediums in the mines. Visiting a place, can give you an experience, and in turn your experience of that place adds to the culture and memories surrounding that place, both in your personal experience and the stories you may tell to the younger generation. Thinking about maps and journeys in this way is a different approach from what I was thinking of before.

Following on from this, we had a large group tutorial with Kathleen to discuss my ideas for the project. One new idea that has struck me since my last post about it, is to combine some of my earlier ideas of looking at processes, and the human body. I feel that some of the structures we place around us are reflective of processes and networks which happen within the human body, and the actions that humans take in the world outside the body reflect the processes that happen inside the body as well. Kathleen said it was a nice idea and started to talk about several examples of the kind of thing I had in mind. She highlighted things such as 1920's exercise regimes which involved making shapes which were considered unnatural movements:


This is much like modern yoga, which is all about flowing from one pose to another. 

Kathleen also recommended a book called 'The Work of Art in the Age of Mechanical Reproduction' by Walter Benjamin. I have taken out this book in the hope of coming to understand works that follow a similar line to what I am interested in.


Thursday 9 October 2014

Psychogeography Task

In our lecture with Leah two weeks ago, we were set a task of doing a piece of psychogeography and producing an outcome to show to the class on 10th October. This was supposed to mimic the piece that Leah had written that was inspired by Bill Drummond's own work, and we were supposed to draw our own names into the surrounding area and walk that. However, I decided to take a slightly different approach to this task.

When Leah started introducing us more to Psychogeography and artists that produce works along this 'criteria' as it were, it reminded me so much of Geocaching; which I am very familiar with. Geocaching is an international online site where people go and place 'caches' in the form of whatever they like. This could be a tupperware box, small magnet lockbox, or even something as extravagant as a fake pinecone with a hidden compartment. The idea is then to post this cache online with coordinates indicating its location. The user will then go there and take an object from the cache, only if they are to replace the item with something of equal or greater value. There always features a logbook also to record your visit there. You can then log online that you have found it. Some caches are posted as part of series, or puzzle, which you have to find answers to in order to find the cache. This is what I decided to do for my psychogeography project.


This one had a grid and various places which would reveal a name to you at the end. It's a very good way to learn more about your surroundings and to gain new experiences.


The main thing this project taught me was that the use of sound alongside photographs can bring them to life in a completely different way; It is different experience to viewing film, however. It requires you to use your imagination and put yourself in a place that I find particularly mentally challenging. Also, the experiences I had on this journey allowed me to meet new people and see my surroundings in a way I never have before.

For example, in the hours I spent walking around Farnham I experienced talking to new people that I see all the time but never engaged with, witnessed a car crash, discovered a small cafe that I like, found quiet in a place which has so many cars.

EDIT: During the lecture with Leah, in which we presented this work. She seemed to like the idea behind the walk, but her criticism of it was that I didn't include the geocaching element of it enough. As I came from the idea of Geocaching in my mapping out of my route, she felt I could have included that in the final work much more. 

Wednesday 8 October 2014

Sound Workshop- Recording Sound and Mixing.

Last week, I recorded my sounds for my project. I booked out the Marantz recorder we were supposed to be using as soon as possible, and wrote down a list of sounds that I wanted to record:


I decided to use my car to record, as I wanted to see how effective it could be, and the differences it had in comparison to recording in a room in my house as I did last year. The main difference I noticed was the lack of echo in the car. The interior of the car being fabric rather than metal made a clear difference to how the space sounded on the recording. Also, the car was very good at blocking out sounds so I could get a clear recording. However, I did experience some noise pollution on my recordings during the day as I live near a main road. So, I decided to do most of my recording at night to avoid this, and I found it very effective.

Once I got my recording into Pro Tools, I started by naming all of my tracks so that I could easily find the parts I wanted and use them. I had my piece of text in front of me, to aid me in my structure of the piece, and I also put my voice recording in first so I could shape my work around the pacing of my speech. Further on my comment of Pro Tools, I did experience some background noise on my recordings, so I wanted to clean them up before I started working on them. After discussing with Harry, he explained that Pro Tools is good at arranging sounds and mixing them together, but it is not adequately equipped with the tools to clean up sounds. So, I decided to import some of my sounds into Adobe Audition, and use the noise reduction tool to make my recordings slightly cleaner.

Saturday 4 October 2014

Maps and Journeys- Group Tutorial 1 and development of ideas.

In this tutorial, I was very interested to hear other peoples ideas about the project, and I was intrigued in the different interpretations everyone had on the brief. For myself, I explained my project ideas as highlighted in my earlier post here,  and Rosie seemed to be interested, but I felt that it needed more development, and so did she. She said that our lecture next Friday with Kathleen Rogers would look more in to the ideas that I had brought up. She also suggested perhaps looking into Geocaching as a starting point for my art work, as I already have a vast knowledge of that subject matter, and so using something as a hobby and turning it into something artistic might be quite interesting. However, I was not sure I wanted to involve my hobby in my work, as I quite like to keep my work and my play separate from each other. Although it is something I can certainly consider. I look briefly into some geocaching art and found some rather creative geocaching pictures made by a series of caches placed precisely to show up on the geocaching map as an image:


However, since looking at this, I have thought of a concept for another idea I could look into. I am very interested in sound design at the moment, having enjoyed my sound work from last year, and now doing the sound workshops for Professional Toolkit this year. So, I thought I could try and figure out a way to turn sound into an image in such a way that I could use it for cartography. I know similar things have been done with Rebeca.org, but I would like to turn sound itself into an image, rather than mapping where sounds have been taken. For example, I stumbled across a business which turns audio files of famous speeches or phrases into prints that you can buy:


I also looked into other experiments with sound as an image, such as a resonance experiment done on youtube:


If I were to follow up with this idea, then I would have to do some serious experimentation on how to achieve this goal, and also what I want to say with the piece. I am also still interested in following up the ideas that I mentioned in my previous post. However, these are my thoughts for the moment, with updates to come.

Maps and Journeys- 2/10 lecture.

Yesterday we attended a lecture provided by Dr Yuwei Lin and Rosie on Cultural Geography and Mapping, and GPS, Telepresence and internet art.

During the first half of the lecture, Yuwei demonstrated how maps can be used as a form of narrative, such as the map of The Shire from Lord of the Rings, and how maps from the past and the present can be used to make political and religious statements, as a motion of power over a people. As can be seen in the Psalter Map, where North, East, South and West have been rearranged for the purpose of making a religious statement, claiming that God comes from the East:


Also, in modern maps there are some statements of political power, such as in this map of China, which includes Taiwan as part of China, despite being a different country:


Yuwei also spoke about how maps can be used to play games, such as in Geocaching, which is an international treasure hunt, started and maintained by others. This is something I was very familiar with as I partake in it regularly and have already incorporated it into elements of this project. Also, she described how maps can be a conceptual representation of a place from a perspective of someone, rather than a literal one. It became apparent to me after this part of the lecture that maps aren't always for simply plotting data and can be used to show a variety of things such as: personal experience, knowledge, memories, identities, belongings, emotions.

The second half of the lecture, presented by Rosie, was more of a presentation of works that were relevant to the subject matter that she wants us to explore for our projects. 

The first artist was Iain Mott, who did sound-mapping in the 80's, using early GPS methods in suitcases to produce sounds with movement. Although now there are many smartphone apps like this and most phones have the technology that he was putting into suitcases, I still realise how important those early experiments were to the technology we have today.

We then looked at artists which had use sound and places together, such as Rebeca.org which is a map of all the places in the world they play an instrument called the Rebeca. Also an artist called Masaki Fujihata who started a project called voicesofaliveness.net. This is a website which exhibits different people following a path on a bicycle and screaming at the same time. 

However the artist I found most interesting was Aram Bartholl, a Dutch artist who does a lot of internet related work, which tackles issues with internet surveillance and the safety of personal information, for example, his installation work called Forgot Your Password? Which is a book with passwords leaked from the networking site LinkedIn.


I really liked this piece of work as it was a very plain and artistic way of showing how vulnerable our personal information is when we look at it in a seemingly 'published' book out for public view. He has also done similar work with postcards, where he took photographs of wifi passwords he had come across and displayed then on a postcard rack, as if to be sold.


Thursday 2 October 2014

Maps and Journeys- Initial Ideas

Having had a week to ponder on the maps and journeys project, I have to say that this has been the most difficult brief in terms of production of ideas, as there is such a large scope for the project that I have found it difficult to pinpoint a specific idea.


To begin with, I decided to look at the literal definitions of the terms 'map' and 'journey'. This helped me provide a base for myself to work from. From this I came up with a few ideas that I could possibly develop further:

-Projection Photography- I tried to research experimental travel photography, and in doing so came across the photographer Davis Ayer who appears to use a lot of overlaying, colour, and double exposure in his work. However, I was particularly interested in his projection photography work, where he projected pictures of places onto the naked body and photographed it in a piece called 'time travel'


I was interested in this because of its connections with memory and how people remember a place. In my mind when people are stressed due to pressures from daily life, they dream of getting away to somewhere, and perhaps that is a particular place they have in mind.

On another extension of this, I also thought of processes in terms of biology, and how a piece of land and everything that is living is constantly changing, and moving underneath its own skin. I thought perhaps I could travel to different places and collect items from these places, then project on these items short looping videos of biological processes that are and may have been going on inside these objects, as a sort of cross-section. I thought I could perhaps include some sound elements in this as well.

I have many other thoughts floating in my head about what I could do, so nothing is solid yet. However as an initial idea I think I'm heading on the right track.


Tuesday 30 September 2014

Sound Workshop- Working with Protools

In this second session of my sound design workshops, we started looking at protools and tried to grasp the basics of it, as this is the software we were using for our projects. Having previously used Adobe Audition, I was sure I could pick up this software fairly easily, as I figured that the tools would be the same in many ways, but the layouts and placements of these would be different.


We firstly looked at very basic settings, like how to set up your project, what the layout of the program was like and how to add new tracks and import files. All of this was fairly similar to audition and it was easy to see how you could build up from a blank canvas to a complex project quite easily.


We then looked at some basic tools like cutting and extracting bits of audio, We did some recordings of our own, and then looked at organising the tracks and creating buses.


Having gone through the basics, we started looking at some of the effects we would be using for our projects. I have to say that this was a major difference for me from Audition as the interface of Protools is a lot more user friendly, which was not a bad thing, but not having everything simply listed and more as you would see it on a physical desk was a change.


One of the cooler things about Protools I found was this selector that allowed you to select multiple tools at once, and changed depending on where you hovered your mouse over the audio. I liked this as it eliminated some of the use for shortcuts, and could make your work slightly more efficient as it saves you from changing between tools all the time.

After this session I decided I wanted to aim for using Lynda.com to complete the essential training for Protools so I could have a more complete understanding of the program, which would ultimately make it easier when it comes to creating my project.