Friday 28 March 2014

Places In Memory

Last weekend I did a few tests on the previous idea of joining images together from different places. I was struggling to see how this would work in a practical sense and so I wanted to give it a little experimentation before I went out and took my photographs:


Although the blurring on the edges was just a quick job, I feel it necessary to say that I won't be doing it like that in the final result. From this quick experiment, I know I'll have to show the edges of the photograph somehow to allow the viewer to make sense of the fact that parts of the room they are looking at are from different images together.

Another element I want to try and add is photographs from my own personal family collection. Since this originates from my own past, I think it would be a good idea to use old photographs as part of the final pictures.

I have also had perhaps an idea about my presentation of these images. I was thinking that once I had created essentially five rooms made from all different pictures of places, I could draw out a blueprint of a house layout which includes the elements you see in the photograph. It would be an interesting way of displaying a distorted house, and maybe it would help the audience grasp the concept, especially if I centred the images around this blueprint so that they could be viewed together in one go.

Film Updates and Tutorials

I know it's been a while since I last posted, but it's been very busy in terms of where this film is going. Myself and Nick have now filmed our illusions and are in the edit with them. They came out really well:


We are now just trying to figure out the best way to present them. To start with we have decided to do a minute or so of quick cuts to be able to give the audience a taste of what this is about, and then slow it right down and give the audience a chance to view each illusion in a bit more depth so that they can try to make sense of it. We also have some behind the scenes footage to add in to it somewhere as well, with the prospect of putting it more towards the end.

We had a tutorial with Anne Parisio on Monday, which gave us a chance to get some feedback on our film. She seemed very interested by our concept and quite impressed with what we had done so far. She commented that she thought the audience needed to see the workings of the illusions as a sort of personal interest part of the idea. We explained that we were going to do that in some way, but more towards the end so as not to reveal all at once.

Aside from the actual film we are also trying to get a studio space booked for our assessment presentation so that we can set the illusion up as an installation which people can come and try and play around with as opposed to doing a presentation. That way our audience and our lecturers can get a real sense of what it is we have done, and can see it for themselves.

The only thing we really need to focus on now is what we are doing with sound in the film. We are cutting to music at the moment to get an idea of pace, but we need to decide what we actually want our sound to be like in the film, and that will be our next step.

Time Art Review

Today I had my Time Art review, which gave me a chance to see how my work would be viewed at the actual screening, on 3 portrait screens. However, my exports for some reason did not save to my hard drive and so I only had the one screen to show, which was frustrating, but I could still benefit from seeing if my aspect ratio and codec worked ok.

Here are my three screens as they should have been seen:


Simon's main comments about my work was that there were some inaccuracies with light and colour in my matte painting. The bottom of the sea bed should be more murky, and my light should have more of a realistic direction in terms of how the picture was in real life.

Also, he didn't seem to get at first that it was meant to be an underwater city, and so I think I need to make that more obvious. It's missing a haze you get when you look at something underwater, and the buildings need to be more rusted and destroyed. Also, the trees are becoming seaweed branches to make it more obvious. I may also add some fish in if I think it will help.

The only other thing I can mention is the codec I used made it difficult for the computer to play my video back. I need to make it into something like Apple Pro Rez when I do my final export.

Experimental Sound Review


Last Friday I had a progress review of my experimental sound project before Simon and Joe to get some feedback and for them to see where I'm at with the project. After explaining my idea and showing them what I had created so far, it was obvious to me that some of the levels in my project needed changing. The music in my piece is much louder through the speakers in the room we were in than my own at home and so drowned out a lot of the other sounds that I wanted them to hear, which was quite frustrating but at least I know now.

Aside from that the feedback I got was constructive. Simon felt that I needed to place my piece in the time it is set much more, to let the audience know that is where we are. Joe seemed to like the piece and suggested that I look at more sounds that are created in the space of a city at night and a diner like the one in Nighthawks. He told me to dive into the culture of that time and really ram it home to the audience. Both Simon and Joe also agreed that there should be more of the piece set in the diner, and that there could perhaps be some sort of interaction between characters in the space.

Overall I thought it went well, I was aware that I still had a lot of work to do and that there was a lot more to bring to the piece.

Tuesday 18 March 2014

Re-reconsideration

After talking to Rosie about my idea of restoration, we came to the conclusion that this was almost the opposite of the idea I started with in terms of the glitching idea, and I felt that I still wanted to hold true to this original idea. The origin of this idea came from my inability to remember places correctly from my childhood, having moved around a lot I find that my memories of certain places blur and bond together to create a new place in my head altogether, and this is what I want to show.

Rosie found this quite interesting, and as I am going home next week I suggested that I go back to these places and photograph them, then put them together in post in such a way that they blur together and create an interesting architecture or space in itself. I like this idea as it still produces the glitching and it shows the origins of the idea whilst putting something of myself into the project as well.

I can certainly do the image restoration still as a project, but I think it is too much work for this one given the time I have.

Saturday 15 March 2014

Mixing

In yesterday's workshop we learnt about mixing, and compression. A compressor controls the level of our sound to ensure it is under the -10db legal limit. However, this can be problematic as you may be able to hear this being done, which is obviously quite unwanted. For example, the sound in Breaking Bad does this and it can be quite noticeable if you know it's there.


Because of this, we have to be careful with how much we use it and try and get the values right on the individual sounds rather than relying on the master.

Sibilance and EQ

Today's workshop dealt with qualities of sound. I already knew about bass, mid, and treble and this workshop addressed how you can manipulate sound through EQ's to enhance certain areas on that range. For example, mids are vocal tones, so you can enhance voice over or dialogue by using that part more than say, bass (depending on the voice).


Then we looked at reverb, and how reverb helps create space by changing how a sound may reflect off of the environment it's in. Audition has a hell of a lot of options when it comes to creating different reverb, but it also has a lot of presets to start you off with.


Lastly, we looked at how we can get rid of certain noises in Audition. Using waveform mode, we can activate the spectral frequency display, which allows us to 'see' what our sounds look like. From here we can visually get an idea of any bad qualities in our sound, or harsh notes on dialogue such a sibilance created in the treble range.


Track Laying

Our first workshop into Adobe Audition was all about track laying, putting audio into different channels to build up an atmosphere. It was an interesting exercise as you really saw how you go about building up sounds to create an environment when editing audio to video.

In the exercise we were given sounds to work with, and the first 16 seconds of Toy Story 3 to put the sound to, creating that world, that environment. We went through the basics of layouts of audition and editing tools such as the razor tool, and how to produce fade ins and fade outs. I worked on this mostly in class, and then finished it off at home:


This exercise was really useful, and opened my mind up much more into how you can create an environment purely using sound. Even if the sounds individually may not sound quite right, when they are with other sounds or are integrated with images it is clear to me that they can actually sound pretty good. This should help me when it comes to my project to not dismiss recordings too early if I think they aren't great, as I could get something out of them somehow.

Development

Last week, I had a tutorial with Simon that allowed him to see where my project was going. I had only been really putting the footage I wanted into my film and arranging it. The nature of my film means I want the audience to understand what they are seeing, and experience it fully. However, I had first thought to have the images playing one after another, showing maybe one shot or two of that footage to get a sense of the amount of footage of this type there is.

However, Simon thought it would be more beneficial if I could think of way to let the audience experience all the footage together that is not just a linear progression, and that the screens showing the differing types of footage needed to show a link somehow. I thought about this, and decided it would be best to put the footage into a collage on the screen, changing it every so often so that the audience sees all the footage at once and has time to take it in:


So, the footage looks more like the left screen than the right as shown above.

Personally I prefer this way of doing it much more, and it gives me a much easier job in seeing how the footage interacts with each other when seen altogether.

Friday 14 March 2014

Reconsideration

After talking to Rosie about my proposition for the image glitching presentation, I am feeling much more confident about the idea. Originally I had in mind to shoot some stereotypical friendship photographs to then glitch, as more people can relate to it and such. However, I'm now unsure as I feel like those photographs won't mean anything to me.

When I think of Reflections in terms of memories, I think of how we remember places. Have you ever tried to remember a house you used to live in? How accurate do you think that depiction is? This is what interests me about the glitching idea, as it can demonstrate that in a randomized way, as you would remember it. However I feel like the photographs themselves should hold some sort of meaning, some sort of precious value to really demonstrate the loss to the audience, and I just don't think a stock photography style will do that.

I thought about trying to get my family to re-create family photographs that we have, however I don't think I have time to go home and do that. So I still had a think about how I could perhaps use the wealth of photographs my family has, some of which are over 100 years old. I am currently thinking now about perhaps doing digital restoration on old photographs to colour, and changing the colour scheme of those photographs to differentiate details of the event, then glitching them to create a series of almost identical memories.

I've had a short play with this idea using a picture of my grandad when he was in his 20's:


I firstly used the crop and straighten tool to get rid of borders and straighten the image.

I then sharpened the image to get rid of unwanted blur from the camera not being held steady/ not on a tripod.


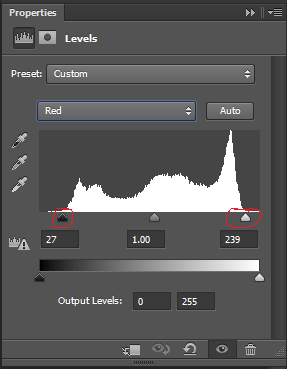
I then went in the levels of each colour channel to drag the low and high end markers to where the information starts so that the picture looks less faded and the contrasts are much more prominent.


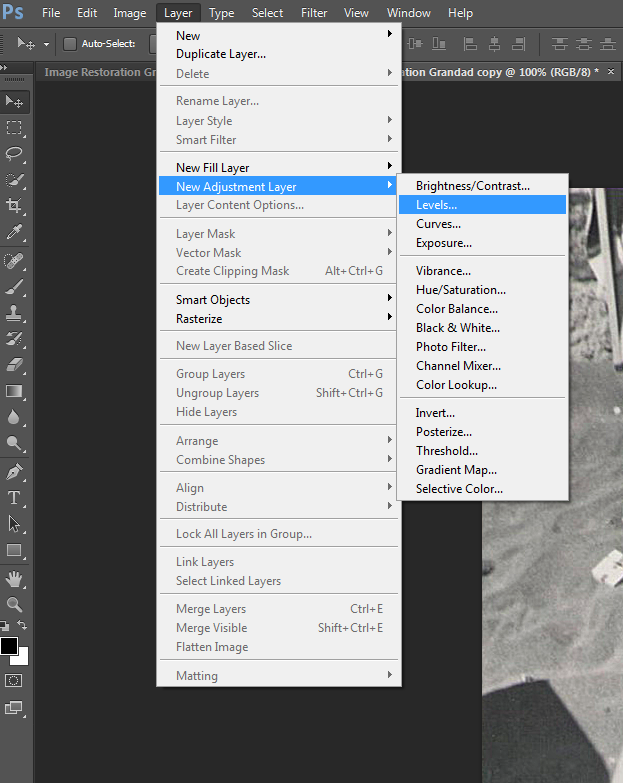
I then went used the magic wand tool to start selecting areas to colourize, and used hue and saturation to add colour in. I did this quickly, but it still took a long time which concerns me slightly about this idea, however I like the effect it may give.


Friday 7 March 2014

Reflections Experimentation

Myself and Nick felt that we needed another week to get our heads around this project, and do some more experimentation into how it will work. Our idea has essentially developed into a documentation of an installation, with the presentation of the installation mixed into the film.

What we are trying to do is create a pseudoscope with cameras as opposed to mirrors. We tried experimenting with this on Tuesday to see how this works and we had some difficulty with the setup, but overall it came out really well.

Our original plan was to have it set up like so:

Pseudoscope_mirror_stratton.PNG

Figures M and N being the macs with their cameras activated, and figures L and R being 2 DSLR's to simulate each human eye. However, because these are cameras and not mirrors, the R line bounced diagonally off of figure M as opposed to straight ahead as suggested in the diagram. We thought it would be good to try and get this effect, and so we ordered two A4 perspex mirrors to test out a more traditional pseudoscope setup. 

I edited together the footage we got from the 4 cameras from our test on Tuesday, and we still got a very cool and disillusioning effect: