Showing posts with label Reflections. Show all posts

Sunday, 27 April 2014

Reflections Photography Evaluation

This project has been an interesting one for me, as the contrast from where I started with my idea to see what I ended up with is stark. From my beginning of thinking about image glitching art to represent broken memories, and my experimentation with that type of photography I knew I wanted to do something along the lines of that:


However I got stuck in a dead end trying to figure out what to shoot, and how to develop the idea further. After a conversation with Rosie I found that my idea had stemmed mostly from my own experience of confusing layouts of houses I have lived in, having moved around a lot. From then I found inspiration came quite easily. However I still think there is something in image glitching, and feel I could do something more with that in the future.

Once I had my idea, everything came quite naturally, and I didn't really have any problems until I came to shoot. I had access to houses I used to live in, but I didn't manage to get around to them all as I only had just over 24 hours to get to around 8 houses, so I had to compromise in some areas of my photography work, using photographs I already had of those houses, and taking photographs of a friends' house which was very similar to one of the houses I wanted to photograph. In hindsight I think I should have either gone back to shoot, or taken more time out to go and shoot my photographs fully.

In post-production is where I spent most of my time, and I felt that part of the project was the part I enjoyed the most, as I have already lined out in a previous post (which can be found here) I found playing around with different settings really interesting in terms of how different they could make the photographs look, and I spent a good number of hours just trying to get something I was happy with. One thing I thought was a particularly good decision on my part was shooting in RAW, so I could take the photographs into lightroom and adjust the photographs to make them look quite similar. It really made the whole post-production side of the project much easier, and less stressful than it could have been.

Having yet to hang my work in the assessment space, I can't really comment on the arrangement of the work too much as I have yet to see how they will be perceived. However, I do think the blueprint I fashioned added something to the piece, another layer of understanding which I think was essential for the audience to know to fully appreciate the photography. Saying that, I don't think the photographs are too dependent on the blueprint for understanding. They just provide information about my thinking behind the photographs, though I feel they could easily insert their own meanings to them as well.

Overall I was pleased with what I managed to come out with at the end of this project. The only real regrets I have is wanting more time to shoot, and spending so long on trying to figure out what I wanted to do for the project. Although I am happy with what I have done, I feel as if maybe they could have been even better had I realised sooner what it is I wanted to do. What I've learned from it, is that I mustn't get stuck with one idea, and explore other areas surrounding that idea too, so I don't miss something that could potentially be quite a good idea.

Displaying My Photography

As the assessment for this project includes hanging the series in my own arranged wall space, I needed to think of a way to hang them. I also felt that I could use something to accompany the photographs which would make more sense of them for an audience, as you can clearly see what I've done in the photographs, but there is a lack of knowing why I have done it.

I thought of the idea of creating a blueprint surrounding the rooms, to create a small floorplan of a house which takes into account the layout of each room I have created, and then perhaps using annotations to describe particular elements of that house, describing memories I have associated with elements of each individual photograph. After discussing this with Rosie she felt it could be a strong part of the piece as a whole and so I went ahead with it.

my original desire was to actually make blueprint paper, using some chemicals to treat paper in a darkroom like environment, and then exposing it to sunlight with my design on the paper. (Tutorial for this can be found here.) However, I decided to keep it much simpler and less technical, so I bought a large sheet of blue paper and some white pens and started drawing the floorplan out myself. I firstly did it on paper much smaller, to plan out the layout of my house and then I transferred this on a much bigger scale to my blue paper.


After adding some small features of each room I was quite happy with how my technical drawing turned out.


My annotations then consisted of small personal excerpts of my memories or knowledge of each place, to provide context.

All I need to do now is consider how I'm going to arrange my photographs, which are mounted on foam board with to the floorplan.


Photography Post-Production Results

After working in post with my photographs, I have come up with 5 final photographs for the series that I feel happy with:


As this was so heavy on post production, I spent a lot of time in photoshop just trying to get the overlaying right. Most of which came down to just choosing the right blending options of individual layers, and playing around with the opacity, and fill opacity of each one as well:


I also sometimes found that the underlying image had objects which obscured the image I was trying to lay on top, regardless of how I tried to blend it, and those occasions I mostly used the clone tool to create a roughly block colour background that matched the rest of the image, which made it a lot easier:


The incorporation of the older images was surprisingly easy as the underexposure of some photographs often made it easier to blend the images in the way I wanted, and created a really nice effect on the edges of the photos too.

Overall I found the post-production mostly just a process of playing around with each image to see what worked for each one, and it was actually very enjoyable to see what effects I could create by doing different things to the image.


Places in Memory: The Shoot

After my experimentation on the overlapping idea, I discussed it with Rosie and she thought it could be quite strong as well. So as I was going home for the weekend I decided to shoot my photography work.

My idea includes shooting around various houses I used to live in, some of which I still have access to and shoot all the rooms so that I can overlap them to create 5 new rooms out of them. I also thought it would be a nice idea to use old family photographs from the inside of houses as my family luckily was very big on taking photographs when I was younger, and much earlier too.

A few results from my shoot:


I shot them all in RAW so I could take them into lightroom in post to do some basic colour correction on them so that they all looked fairly similar, just to make it easier to blend into each other. I wanted to make it a little easier for myself as I had no control over the condition of the old photographs I wanted to use, and so would be spending a lot of time on those elements of the photographs.


Saturday, 26 April 2014

Reflections Film: Final Review

This project was always quite conceptually difficult from start to finish. With my research into the initial spark of an idea I had to pitch, and then working with Nick to develop it. However I think in the end it turned into something much more interesting than I ever expected.

The idea surrounding illusions and coming up with the illusions that we eventually went to create required a lot of experimentation just to get our heads around the science of what we were actually doing (As seen below).


Working with mirror illusions has been an interest of mine for quite some time, and what we came up with was interesting twist on that I think, although initially quite confusing, once we had our heads around it we found some flexibility with it. It also made it a little easier to come up with ways of helping the audience understand that in the film. The only wish I had was that we had more time to really get to grips with what we could do with the project, but before we knew it we had to go and shoot something.

Similar to the set-ups above, we decided to take our illusions out into the world and try and use the environment, people and architecture to confuse the space and present our illusion to an audience. Working in a two man team was difficult, but we tried to keep as organised as we could, and the set was very lighthearted. We also enlisted our classmate; Rob to film our experience on set in the hope that we could use that in the film. I felt that we worked really well together on set and it was a very enjoyable experience shooting it, not only because of that but because we could see what we were creating and were quite happy with how it was turning out for us.

Once we were in the edit and could see what footage we had, we were happy with what we had and didn't feel that we needed to do anymore shooting. The only problem we faced was trying to convey what we knew about the illusions to the audience, without totally giving it away. This took some planning, and we spent a bit of time discussing it and how much time it would take to get to a rough cut so that we could keep to schedule as well as make the best film possible. A lot of initial time was taken by organising the clips, as both of us were novices in editing multi-camera work so we tried to keep the workspace organised. Our plan for the edit was generally to start with some short shots of each illusion, and to show some clips of the process and then to slow the illusions right down to give the audience some time to look at them and understand them, as well as showing more clips of the process of making the film to give some further insight. We felt this was the best way to let the audience experience the illusion, then to help them understand it, which we felt more confident about after Anne suggested the same to us in her tutorial.

Overall after the film was finished I was really happy with how it turned out. With all that's left is to display the illusion in a gallery space with the photography work, which I think will provide a better experience for the audience, I felt that we achieved what we set out to do. If perhaps we had a bit more time then we could have done more with the illusion, or set it up like an installation to begin with, but considering the time we had I think we did something that fit the brief quite well, and we had a good time making it which made it so much more worth the while.


The Film and the Peer Group Assessment

After a last hectic week of editing to get the film to a point where both Nick and I were happy with it, we had our peer group assessment, and last tutorial on our films with Rosie. After she had watched it, she commented that she liked the illusions that we had created, but almost didn't get what they were sometimes and felt that the audience needed more time to look at them. Although we are going to be setting up our illusions in a gallery space with the photography work, where people can come and view it, she felt it needed to stand up on its own as a film as well.

She also said that there were some shots in the illusions that she felt weren't necessary, and didn't add anything to the film. I disagreed as I felt that each split on the screen offered a different perspective on the space the cameras were showing, and so helped the illusion a little more.

There were a few other little things we discussed, like editing choices and titles, which I will be going back into the edit suite to change later.

Overall I think Rosie saw that both Nick and I were quite attached to the film, and we told her how much fun we had making it and how we felt we worked well together, so I hope that she saw that we really felt we gained something from the project.


Tutorial with Leah Gordon

After working with the comments Anne made about our work in our last tutorial, we now had Leah view our work and make some comments of her own. After watching the piece, we had a short discussion about the film and our intentions for it. She suggested that we try and figure out what we were trying to say with the film in terms of memory. She seemed fine with the film in itself, but felt that we needed to just try and be firmly settled in what we wanted to say with it, and then let that reflect in the piece as well.

I feel as if we do know what we're trying to say with it, but Leah made various references to different artists for myself and Nick to research for a perhaps educational purpose more into the theory behind what we are trying to create with the film.

Friday, 28 March 2014

Places In Memory

Last weekend I did a few tests on the previous idea of joining images together from different places. I was struggling to see how this would work in a practical sense and so I wanted to give it a little experimentation before I went out and took my photographs:


Although the blurring on the edges was just a quick job, I feel it necessary to say that I won't be doing it like that in the final result. From this quick experiment, I know I'll have to show the edges of the photograph somehow to allow the viewer to make sense of the fact that parts of the room they are looking at are from different images together.

Another element I want to try and add is photographs from my own personal family collection. Since this originates from my own past, I think it would be a good idea to use old photographs as part of the final pictures.

I have also had perhaps an idea about my presentation of these images. I was thinking that once I had created essentially five rooms made from all different pictures of places, I could draw out a blueprint of a house layout which includes the elements you see in the photograph. It would be an interesting way of displaying a distorted house, and maybe it would help the audience grasp the concept, especially if I centred the images around this blueprint so that they could be viewed together in one go.

Film Updates and Tutorials

I know it's been a while since I last posted, but it's been very busy in terms of where this film is going. Myself and Nick have now filmed our illusions and are in the edit with them. They came out really well:


We are now just trying to figure out the best way to present them. To start with we have decided to do a minute or so of quick cuts to be able to give the audience a taste of what this is about, and then slow it right down and give the audience a chance to view each illusion in a bit more depth so that they can try to make sense of it. We also have some behind the scenes footage to add in to it somewhere as well, with the prospect of putting it more towards the end.

We had a tutorial with Anne Parisio on Monday, which gave us a chance to get some feedback on our film. She seemed very interested by our concept and quite impressed with what we had done so far. She commented that she thought the audience needed to see the workings of the illusions as a sort of personal interest part of the idea. We explained that we were going to do that in some way, but more towards the end so as not to reveal all at once.

Aside from the actual film we are also trying to get a studio space booked for our assessment presentation so that we can set the illusion up as an installation which people can come and try and play around with as opposed to doing a presentation. That way our audience and our lecturers can get a real sense of what it is we have done, and can see it for themselves.

The only thing we really need to focus on now is what we are doing with sound in the film. We are cutting to music at the moment to get an idea of pace, but we need to decide what we actually want our sound to be like in the film, and that will be our next step.

Tuesday, 18 March 2014

Re-reconsideration

After talking to Rosie about my idea of restoration, we came to the conclusion that this was almost the opposite of the idea I started with in terms of the glitching idea, and I felt that I still wanted to hold true to this original idea. The origin of this idea came from my inability to remember places correctly from my childhood, having moved around a lot I find that my memories of certain places blur and bond together to create a new place in my head altogether, and this is what I want to show.

Rosie found this quite interesting, and as I am going home next week I suggested that I go back to these places and photograph them, then put them together in post in such a way that they blur together and create an interesting architecture or space in itself. I like this idea as it still produces the glitching and it shows the origins of the idea whilst putting something of myself into the project as well.

I can certainly do the image restoration still as a project, but I think it is too much work for this one given the time I have.

Friday, 14 March 2014

Reconsideration

After talking to Rosie about my proposition for the image glitching presentation, I am feeling much more confident about the idea. Originally I had in mind to shoot some stereotypical friendship photographs to then glitch, as more people can relate to it and such. However, I'm now unsure as I feel like those photographs won't mean anything to me.

When I think of Reflections in terms of memories, I think of how we remember places. Have you ever tried to remember a house you used to live in? How accurate do you think that depiction is? This is what interests me about the glitching idea, as it can demonstrate that in a randomized way, as you would remember it. However I feel like the photographs themselves should hold some sort of meaning, some sort of precious value to really demonstrate the loss to the audience, and I just don't think a stock photography style will do that.

I thought about trying to get my family to re-create family photographs that we have, however I don't think I have time to go home and do that. So I still had a think about how I could perhaps use the wealth of photographs my family has, some of which are over 100 years old. I am currently thinking now about perhaps doing digital restoration on old photographs to colour, and changing the colour scheme of those photographs to differentiate details of the event, then glitching them to create a series of almost identical memories.

I've had a short play with this idea using a picture of my grandad when he was in his 20's:


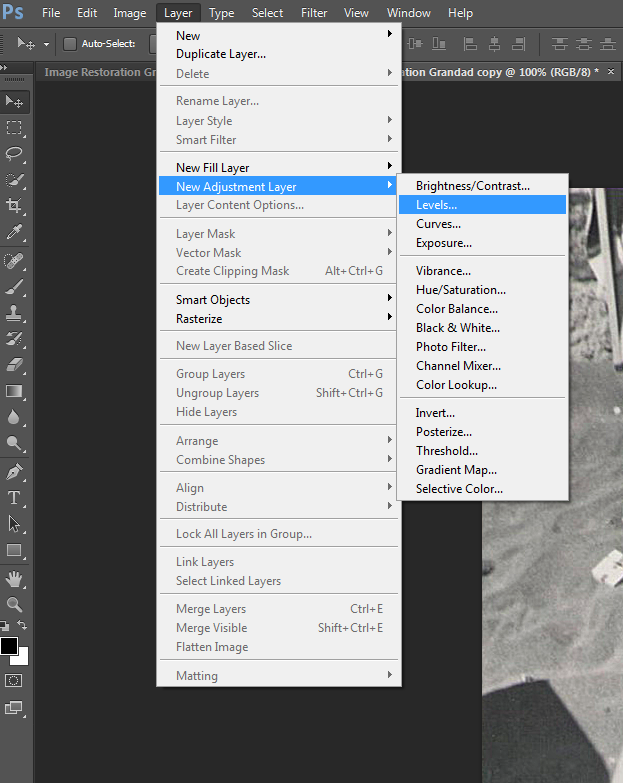
I firstly used the crop and straighten tool to get rid of borders and straighten the image.

I then sharpened the image to get rid of unwanted blur from the camera not being held steady/ not on a tripod.


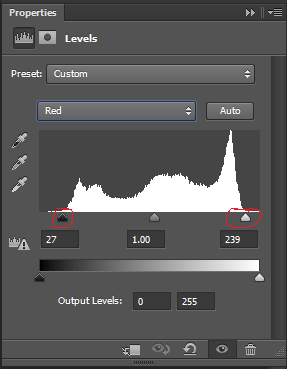
I then went in the levels of each colour channel to drag the low and high end markers to where the information starts so that the picture looks less faded and the contrasts are much more prominent.


I then went used the magic wand tool to start selecting areas to colourize, and used hue and saturation to add colour in. I did this quickly, but it still took a long time which concerns me slightly about this idea, however I like the effect it may give.


Friday, 7 March 2014

Reflections Experimentation

Myself and Nick felt that we needed another week to get our heads around this project, and do some more experimentation into how it will work. Our idea has essentially developed into a documentation of an installation, with the presentation of the installation mixed into the film.

What we are trying to do is create a pseudoscope with cameras as opposed to mirrors. We tried experimenting with this on Tuesday to see how this works and we had some difficulty with the setup, but overall it came out really well.

Our original plan was to have it set up like so:

Pseudoscope_mirror_stratton.PNG

Figures M and N being the macs with their cameras activated, and figures L and R being 2 DSLR's to simulate each human eye. However, because these are cameras and not mirrors, the R line bounced diagonally off of figure M as opposed to straight ahead as suggested in the diagram. We thought it would be good to try and get this effect, and so we ordered two A4 perspex mirrors to test out a more traditional pseudoscope setup. 

I edited together the footage we got from the 4 cameras from our test on Tuesday, and we still got a very cool and disillusioning effect:


Sunday, 23 February 2014

Image Glitching Plan and Presentation


After the tests I did on image glitching, I really thought that was the way to go on the whole glitching side of the process. I liked how random the glitches were and really helps me have as little control as I can over what comes out to convey what I want to.

However I still feel like that isn't enough. This is meant to be a series of 5 images, and as much as I like the image glitching on those images is a good idea, I also feel that displaying them all in one go with no extra effort put into my presentation may make my photographs lose some of their meaning. So at first I found a link to a tutorial of how to create a hacked codec of a file to create an image glitch in a modified version of ubuntu run from a disc, which can be found here:

http://nickbriz.com/glitchcodectutorial/files/GlitchCodecTutorial.pdf

However this tutorial is more about glitching video files, and although I could do this with another type of file, it still wouldn't give me the randomizing I want, and I don't have the skills to modify that tutorial myself, nor do I have the time to learn how to do so.

I googled how to randomize images in premiere as I could perhaps use video to display my photographs, however the comments on how good premiere is at handling images as opposed to other applications was not promising, and I was led to another piece of software called ProShow Producer, which is a picture slide show production program that comes with a multitude of features and has some impressive tools such as keyframing and masking, most of which you couldn't find in something like powerpoint. Here is the cheesy promotional video they made for it:


So for now, I am looking at how I could perhaps use this to present my photographs randomly (or at least seemingly randomly) to show my photographs for their true meaning, and from what I have read in forums surrounding what I want to do, it seems that there are a lot of options surrounding my idea.

Saturday, 22 February 2014

Optical Illusions Further Film Research

After my film was chosen to be made on Tuesday, myself and the only other person in my group currently, Nick, met and discussed the idea. He seemed to like where I wanted to go with it and we decided to research more optical illusions and see what we could film. After having a look on the internet for optical illusions in the surrounding area that we could perhaps go an film (of which I could find none) I did find one that had been created in the local area that we could perhaps create a version of.


I love the simplicity of this one, and the photographer credited with this idea created a variety of these around the country, including Surrey.

I also came across a youtube channel featuring a wealth of optical illusions, with explanations of how and why they work. I love these because they use a variety of materials which offer a way for us to make our own illusions or at least use these in the re-appropriation part of the piece.


Now this is all well and good, but the aim of my piece is to show how little we see of the world based on how our brain incorrectly perceives it. When we see an optical illusion, it is because our brain is hardwired to try to make sense of the image it sees, finding patterns etc. Which is why an optical illusion appears to make sense, often in many ways, but ends up contradicting itself. 

So optical illusions are the tool, but the film needs something more to really run home the message. I was toying with the idea of hiding something in various points in the video, things the audience won't notice because they are focusing on the video. I feel like this would be something to give the audience a better understanding of the film by the end, and I've seen it work really well in other videos before. For example, the gorilla video and another video I saw many years ago:


It's just an idea, but I do think there needs to be another dimension to the film.

Monday, 17 February 2014

Reflections Film Idea

Concept

An observation of optical illusions and how they lie to us reveals how little we actually perceive correctly in our day to day life.

This films lacks narrative, and focuses solely on our perception of the world around us by the re-creation of various optical illusions, and revealing how they lie to us or rather how our brain lies to us.

The concept originally came from my exploration of why we remember, which led to scientific theory behind false memories that people may have and from that, how we actually perceive the world around us. It would seem that we have a selective perception, and we rely on our memory and our imagination to fill in the gaps of our perception, and so it's very easy for us to miss important details. 


Videos such as the one above demonstrate this idea very well, with about 50% of people being fooled by it.

Structure

The film will be shot using a variation of split screen, and mirroring to show the illusion, and also different perspectives of it that will reveal the lie of it.

The variety of optical illusions used will include;
  • How you can look very large next to something bigger than you from far away (the moon, landmarks etc.)
  • When a mirror looks like it goes on forever.
  • When reflections on water seemingly reflect something perfectly.
  • When a 2D object is made to look 3D
  • The effect of looking through a kaleidoscope.
  • Distorted vision, such as looking into a spoon/through a magnifying glass


The simplicity of the optical illusions means that it won't take too much time to set up, and will still be effective. However, revealing the optical illusions through a split screen is the most important part of the film, as it brings across the meaning of the film.

The inspiration for doing this film in this way comes from an exploration of how other films have handled this similar theme:
I came across a Honda advert that used optical illusions for a commercial use, also revealing the illusion.


I also came across a film from 1972 which deals with optical illusion in a digital, and hypnotic sense called Matrix III by John Whitney.


Overall my style looks to reflect the collage and collective style of Christian Marclay’s ‘Telephones’, but more upbeat with a use of split screen to demonstrate multiple perspectives on the same event.


[Updated] After kind suggestions from the comments below, I have had a look at the kind of pacing and visual style I want to have. Someone I knew at college made a film for his foundation in Arts & Media, and I really see the film holding this kind of style and pacing, and the use of mirroring gives it a kind of dynamic I want to get across in my film:


Also, with sound I was considering using vocals from clips discussing the theory behind perception and memory, as I know there are a lot out there overlapping one another in the background. However, I'm aware there's a danger it could become quite uneasy in doing so, so I might have to think about how I go about that quite carefully.

Tuesday, 11 February 2014

Leading the Eye Mk II

My post about leading the audience's eyes in a film last week still remains a strong part of my idea for my film, but after my tutorial with Leah today I realized a few problems with my film; when I pitch it the film will no longer be a surprise to the audience who will be assessing it, and also I feel as if the sequence in which I film this will be quite technically complicated.

While this is a good thing, I thought I'd take a look at a few other areas to explore how I could really demonstrate the points I want to show. I did a few searches about leading the eye in film and I came across optical illusions. It surprises me I hadn't been led to this through my research previously as it is so relevant to my topic.


Although this one is very creepy, it is interesting. I wanted to see how this was done and the science behind optical illusions when I came across this video of optical illusions in film-making with a very brief explanation into why this happens:


I then went and had a look at a few others online.


Re-Anactment Film

A few weeks ago I was given the task to make a re-enactment of an event in history that has been mediated by film. Now, from what I understand of re-enactments is that they can be so much more than just a retelling of the story.

I wanted to do something that showed a different perspective than perhaps people at the time had before, so I decided to do something in living memory. Also, I wanted to do something positive as I am fed up of being a negative creative.


The most important thing for me here was the sound. I've always had a consideration for how sound can affect an audience so I focus on that a lot in my projects. As there was no dialogue, and the visuals themselves were fairly disorientating my film relied quite heavily on the audio for clarification of the perspective we were viewing the event from.

Tuesday, 4 February 2014

Leading the Eye


I've had a thought about what my film could be. After looking at how other creatures see the world, and what we miss when we see images, I think I could demonstrate this in a similar way to how the video with the gorilla does.

My idea is to record a situation, either a POV handheld scenario or filming a character and at first play it in real time. Then play it again in a split screen with that same situation slowed right down almost to a frame still, and have it slowly playing next to it. The idea here is that we will have hidden details in the original film that you may have missed in the real time version. The idea of this is to show you what you miss when you watch something, or indeed go through something in life. I want the audience to realize that what the eye actually sees and remembers in truth is very little. We rely very heavily on our expectations of what is likely to happen and just our plain imagination to fill the gaps in our memory, and as a result we see very little.

I think it's an interesting idea that could work very well and I may do some small tests and a bit more research into this technique to develop my idea a little more.

Friday, 31 January 2014

Light Spectrum


After looking at what humans miss in life in terms of what we see and notice, I decided to look at it from a different angle and a question I had previously considered; How much do we see in terms of light?

The answer is, well, not a lot. We see visible light but there is a whole other spectrum out there to view. Butterflies are thought to have the widest range in terms of seeing across the spectrum of light. Now, I know there is a way to shoot utilising waves such as Ultraviolet and Infrared, and so I had a look at them.


I found this film shot in Infrared film in Congo to capture the impossible, something we can't see. This article to accompany it that I found on No Film School talks more about it in depth:

http://nofilmschool.com/2013/06/infrared-cinematography-documentary-the-enclave/ 

I also had a look at shooting in Ultraviolet, and found a photography project which I found very interesting.


This project, and others have mainly focused on the human form and have been able to show the layer of skin directly below the epidermis, which creates and interesting effect and reveals a lot about the human form that we don't usually see.

Those are my thoughts are the moment, and I think perhaps I could take this idea further in some way and try to interpret it into something I can actually make for a film, since I have set cameras I have to film on and so it is unlikely I could shoot in infrared if I wanted to, and also it would be fairly ambitious to do so.

Image Glitching Exploration

Following my conversation with Rosie on my photography project, I decided to explore the idea of glitching images and removing data in an accidental or random way. I agree with what she said when she suggested that the random and accidental essence of image glitches was something I shouldn't really want to lose to follow my idea and create a full effect.

After some quick googling, I quickly came up with some ideas of how corruption in images can occur:

open the file as text using notepad and delete the first 10 or more lines of text and replace with a bunch of random letters and numbers.

 This post was in a forum from a few years ago and I was unsure as to whether this would work now because of the advancement of operating systems and programs in windows. I was proved right when I tried it a few times and the file came up as corrupted and not view able.

Next I looked at possible online programs I could use to create a similar effect.

The first few images are from a site called Corrutus 3.5, which is a web program where you upload a photo to the site and you click a mode you want it to take in the method of glitching your image and you get a few results to choose from:


The good thing I found about this method is that it is completely random, providing you don't know all of the modes and what they do. The site tells you how the glitching is achieved and you leave the rest to them.

I then tried another site which is an image glitch experiment. In this one, you can upload an image and control the amount of glitching, and how it is glitched, or you can also completely randomise it:


I liked the effect that this gave, although I was disappointed somewhat as the glitching was all very similar, with just different colours and different parts of the image showing, which I felt wasn't random enough and didn't reflect fully what I wanted to show.

The drawback of both of these methods is that they are relatively easy to achieve, and while it creates a nice effect, I feel like it wasn't self-created and I don't know whether I'd be happy letting something else create this corruption. So, I looked at more ways I could create this effect and came across the suggestion of a HEX editor in a forum, which would allow me to change the values of the data in the jpeg to create something perhaps that is viewable, although I haven't had chance to experiment with it yet. However, I would like to experiment with corrupting CR2 files as well as jpegs to see what effect that may give as well.