Showing posts with label Professional Toolkit. Show all posts

Sunday, 22 March 2015

Photography Workshop- 18th March

This was our last photography workshop and today we were looking at printing. Beytan asked us to bring up two prints; one from the studio lighting task, and one from the five images task.


He explained to us the printing process, and how we were going to achieve the result we wanted. He also went through colour calibration manually and with a hardware calibrator in order to allow us to see our images as closely to what was going to be printed as possible.

In order to prepare our images for print, we firstly had to look at our proof setup to ensure it was simulating the right color space and set our rendering intent:


Once we had chosen this, we could then add a sharpening filter if we chose to do so.


With the sharpening filters, you can choose high pass, which will sharpen according to a set radius on a moveable bar. The result is a light sharpen if you choose a small radius such as 1.5 shown here. However I found that I would like it to be sharpened more, and so I chose to use mexican hat sharpening which involves physically putting the values in, however it is mathematically correct in the way it sharpens the image.


Without Mexican Hat


With Mexican Hat

This is an extreme view, and it is much more subtle when looking at the image as a whole, however for me it greatly improved the overall look of the image.

Now we could start to setup our print settings to match the paper, colour profile, printer, rendering intent, and 

The most important thing here was to make sure that photoshop was managing the colours so that the colours would be accurate to what I see on the screen, and to make sure that the rendering intent, and paper are the same as what I am using to get an accurate result.

Once I had made my first print, I placed it on the keyboard with the image on the screen so that I could compare them and determine whether my print was successful.


Wednesday, 4 March 2015

Maya 3D Workshop- 2/3/15

As this was our last session of our Maya workshops, we were tasked with creating a new model and trying to use all the skills we have learnt over the last few weeks. We were asked to make a UFO.

Firstly, I started out with a cylinder and then manipulated it to come up with my basic UFO shape:


I then started mapping out my UV's to enable me to take a UV snapshot and create my texture. After I had done this, I took it into photoshop and painted two different UV textures, a colour and a specular colour:


Colour texture


Specular Colour

The difference with the specular colour is that it determines how much light will bounce off your model. In short, how shiny or matte it will be. To make a surface really shiny you paint it white, and any areas you want completely matte are black. Other shades of grey with have more subtle differences, creating slight shines.


Basic colour texture on my model with no specular.

The final thing we had to do was use baking to creating more detail on our models. To do this, we created a duplicate of the mesh and then added more polygons, which allowed us to create a model with much higher detail. The idea of this was to add subtle details that we can then bake onto the lower poly model, which would be better for game engines to deal with (if you were to make a model for a game). We used the transfer maps option to create our UV normals, which will then tell our lower poly model what detail is going where:


After I had added this and my specular colour, you can really see a difference in the quality of the finished model.


Wednesday, 18 February 2015

Photography Workshop- 17th February

Yesterday we had a studio session attempting to teach us some essential skills for lighting a subject and using studio equipment to potentially enable me to get photography work in the future should I so wish to do so. The main focus today was narrow and broad lighting. This technique is used in much of portrait photography to either enhance features to create a more aesthetically pleasing image, or to bring out character in the face.

We started by looking at some narrow and broad lighting examples:


This example of narrow lighting shows how it highlights the cheekbones and brings attention to the neckline, and the light in the eyes makes the subject look more aesthetically pleasing.


This example of broad lighting shows how this highlights the features as a whole a lot more, rather than lining them with shadow, which brings out more character in the face as a result.

Then we tried to take our photograph examples of narrow and broad lighting:


Narrow Lighting


Broad Lighting

Now that we had gotten to grips with this, we started looking at this type of lighting in context to classical paintings. We firstly looked at broad lighting used by Rembrandt:


Rembrandt was a Dutch painter that used broad lighting in a similar way in most of his commissioned portraits. This is so that he could have consistency across his works, making him much more likely to be hired as the client knew what they would be getting, and it also allowed him to capture the character of the person in the painting. This style of broad lighting not only casts a shadow on one side of the face, but also catches the light in both eyes as they look towards the frame. We were given the task of using one light to achieve this effect:


This effect took a while to get absolutely right, this included having to move the subject and the light around to get the right balance between the two. What I noticed was essential to this photograph was that the subject could not face directly towards the character as that is quite commercial, but also quite imposing. 

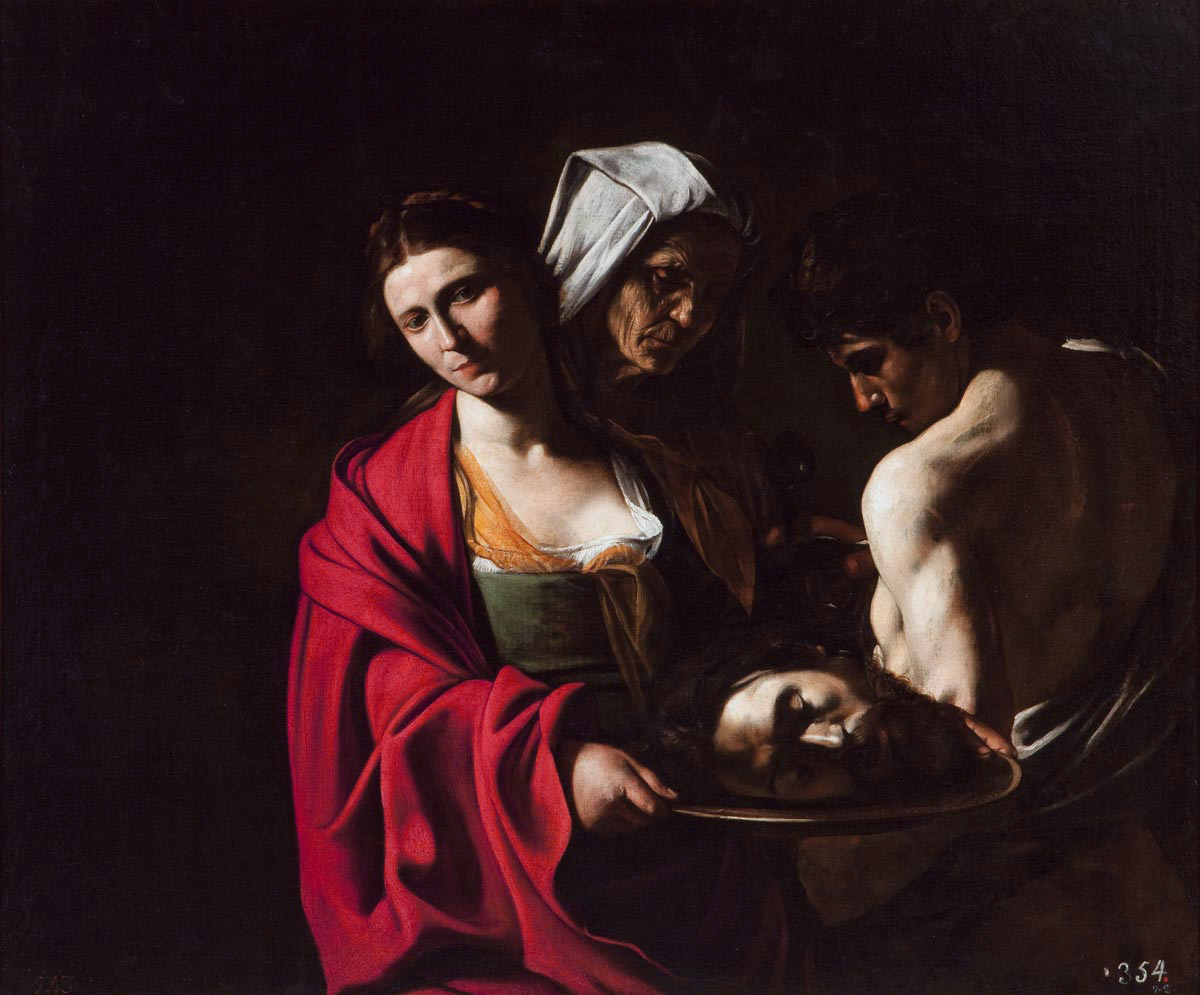
The second style we looked at was the style of Caravaggio, who was a Renaissance painter commissioned by the church to create many depictions of biblical stories. He used narrow lighting from a high position to create heavy shadows in his scenes, which makes the image very dramatic.


We then had a go with a couple of photography students who had kindly volunteered to model for us:


The main thing I discovered about this style of lighting is that using the shadows to your advantage was very important. I loved how, especially in the first picture, you could highlight facial expressions really easily and get a twinkle in the eye which I feel fits with the biblical style of painting.


Monday, 16 February 2015

Maya 3D Workshop- 16th Feb

This week we were moving on to create our planet. We were using a new piece of software alongside Maya called Sculptris; a free modelling tool which is more like sculpting clay than starting from scratch modelling. It allows me to create very high polygon models very quickly to create more detail.

To start with we opened a sphere in Sculptris, and began to add craters and texture using the draw, pinch, inflate etc. tools:


After I was happy with my model, I next had to export the object as a .obj file, and then import it into Maya. I could then create a new sphere to add over the top of my high polygon object, in order to 'vacuum form' it to create a low polygon version:


To create this low polygon version, I had to do something called 'baking'. This is a way of taking the detail of an object and imprinting this onto another object. In this case, we would be using our Sculptris designed model to imprint the detail on to our low polygon Maya sphere. To do this, we opened up a window and chose our source model and our target model, and then selected that we wanted the normals to be created and baked onto the object:


This would then export the sample we have taken as an image to allow us to see whether our baking has worked, which we can tell by the normals exported matching that of the object, rather than having odd bulges or other anomalies:


Once this was done, I separated the Sculptris model from the freshly baked model to see the comparison:


On the left is the original, and on the right is baked version.

I then sampled it again like I did with the normals, but this time using ambient occlusion.


Now that we had done this to our object, I could think about adding colours and textures to make it look like a more interesting object. I can do this in the same way as I have in previous models. First, I add a blinn, and then choose an image to add to the planet texture. I added my colour to the ambient occlusion so not to lose the properties it brought to the object. However, now it looked flat and so I had to use a 'bump map' which allows me to add my normals to my blinn to preserve the detail I had gained from it.


Now I have my planet!

Wednesday, 11 February 2015

Maya 3D Workshop- 9th February

In this session, we were going to review the spaceships of the last session, and start creating asteroids as part of our scene.

With reference to my spaceship of the previous week. I found it fairly easy to texture it at home. However, I came across a couple of issues. Firstly, my texture when applied turned parts of my model black:


As it turned out, I had to use the backface culling option to correct this. The tool may turn the backface of a model transparent to aid the speed of display or the manipulation of objects.

Also, I found that my object was partially transparent as I moved around it in Maya:


I couldn't figure out why this was happening, but I figured that it was something to do with my texture. As it so happens I had put transparency onto one layer of my texture for effect and then saved my file as a .png. However, this meant that the transparency was then applied to the whole of my texture and my model. So I saved it as a .jpeg, which fixed this issue.

Next I moved onto my asteroids. This was a much faster process as I didn't have to learn the basics of Maya as I did last week. However instead of box modelling, we started from a sphere:


We then started manipulating our sphere to create the distorted asteroid shape. Instead of manipulating faces, we were going to manipulate vertices instead. We could also use a tool called soft select, which would also manipulate the area around the vertex we had chosen in order to achieve a more natural and organic shape:


We then applied our checkered blinn and began UV mapping in order to add our texture. This took much more time than last week as we were working with a far more complex, organic shape:


After this was done, we created our texture as before, and then we had our asteroid!


Sunday, 8 February 2015

First Photography Workshop- The RAW File and Using Smart Objects

This first photography workshop began by covering the use of RAW file in photography, and how we can use it to push our photographs even further in post-production. We talked about the use of jpegs vs the use of raw files, and then we were told to go and take some photographs in jpeg and raw in order to try and work with both in photoshop and see what our results would be.

We were told to try and use adjustment layers to recover our photographs in jpeg, which were purposefully shot using the wrong light balance settings. This was the result:


Although this is slightly better than the original image, the blue of the tungsten lighting setting really shows through. Also the darks are far too dark.

When we started editing our photographs in Photoshop, we were confronted by the camera Raw menu: 


This was explained to us as almost like being back behind the camera again. You can change your white balance settings, and many other features in order to improve the look of your photograph. The lecturer told us to use the histogram to see how much information we are getting, and what we are doing to our photographs when we change certain settings.


This second image, which was edited using camera raw in Photoshop shows a staggering difference between the two, and demonstrates clearly how much better shooting in Raw is, compared with jpeg.


First 3D Workshop: 2nd February

In our first workshop for 3D modelling, we were introduced to Maya, an industry standard piece of software.

We jumped straight into 3D modelling and were taught the cube modelling method. This is where you start with a 3D cube and then build your model from that one object. This is good practice and prevents trying to combine lots of objects together later on:


After we had completed the basic model of our spaceship, we had to light the model by creating UVs. This allowed us to determine how a texture would look when applied to our model to combat things such as stretching etc. 


After we had done this, we then took a snapshot of those UVs and brought them into photoshop to paint our texture:


Once we applied this to our model, we then could see the texture on the UV map. It took some trials and error to get them aligned perfectly,


Thursday, 27 November 2014

Professional Toolkit- Filming and Working with Actors.

Our filming day had finally come, and on the first of our two day shoot we were not working with our actor, so most of the day was spent getting any shots or cutaways that did not require the actor. We also lit the master shot for when the actor arrived the next day, so that we could have that ready to go when we got the actor in the next day. We wanted to have as much time with the actor performing as possible so that we could get the most out of him.

I spent most of this day being the stand-in for the actor while the others lit the scene and took some more test shots for the green screen.

On the second day, our actor arrived early as he would rather have been early than late so we set up very quickly and got the actor briefed and with refreshments while we tried to set up the first shot as quickly as possible. Our actor in general was lovely and offered to help on set multiple times. He was also very easy going and didn't need a lot of direction to get what we wanted which was great and very lucky for us. During lunch I spoke to him a little bit about what he does mostly and he described how he had mixed experience of theater and TV. He had done some issue based work before concerning drugs etc. and so I found it very interesting that he was enthusiastic about our project based on his previous work.

On the shoot, I started doing script supervision on the second day and kept timing. Since we started early we were ahead of schedule by about half an hour, so I had to make calls about when we had lunch and which shots we should get done before and after the break. Since we had a subway platter delivered at around 12 I had to make the call to have lunch then rather than at 1. I also took timings of each shot and notes throughout as a script supervisor would to try and highlight any potential continuity problems or give the editor an idea of which takes of the shots appeared to work the best with director's comments and anything I noticed about the shots myself.

Overall it was a very relaxed shooting experience. It was exciting as I felt very professional and we worked very efficiently. The most exciting part of it was seeing all the dollies being used and how the takes ran with the director giving ques and watching from a monitor.